Wednesday, 16 November 2022

Loss Recovery Calculator

 Loss Recovery Calculator -
1. Use 10-20% of Total capital per day
2. Set a fix risk per day
3. Fixed Position size every day
4. Fixed Number of trades per day
5. ONE SINGLE STRATEGY ONLY!!!!

For example, if I have lost 10 lacs - I won't look to recover it in 2 days.
I will break it into SO Parts.

So 20000 profit and 20000 loss per day.

Now out of 100 trading sessions, if I win 70% and lose 30%, still I can recover the whole 10 lacs in 6 months.

This is how you need to calculate.
This is a very good example.

Thursday, 24 December 2020

Is there any perfect formula or method to earn a profit from intraday trading in the share market?

Many intraday traders lose money because they are unable to identify the right trade opportunities. Besides, their emotions will take over in the live market, and they do many random trades that will erode their capital.

Usually, a good intraday trade opportunity can come in any form. It is highly essential to know all the trading types, to differentiate those trading types, identifying the right trading type in the live market on any particular day, and to maintain a balanced mind in all the situations is the key to become successful in intraday trading.

Below are the important trading types which can occur on any trading day:

- Trend Continuation

- Trend Reversal

- Breakout/Breakdown

- False Breakout/False Breakdown

- Random price auction


1 - Trend continuation


When you get a trade opportunity in the direction of the trend with a good risk-reward setup, it can be recognized as Trend continuation or Trend following trading technique. Usually, these trade opportunities are safer but result in small to medium risk-reward trades.


2- Trend Reversal

When you get a trade opportunity in the opposite direction of the trend, it can be recognized as a Trend Reversal trading technique. Usually, these trade opportunities carry more risk but result in good risk-reward trades.


3- Breakout trading concept


If you look at the above image price consolidated within a range from 4-Dec to 12-Dec and on 13th Dec it breaks out from the range and gives a big move on the upside. Only the ‘Breakout’ trading technique gives positive results on this day, and any other trading technique will fail on this day.


4- False Breakout trading concept


False Breakout is a tricky candidate to analyze. Initially, it looks like a beautiful Breakout trade opportunity, and once you opt for a breakout trade, the price moves in the opposite direction. If you look at the above image, initially the price showed strength, and when we think it is ready to break on the upside, it faded that move and moved in the opposite direction.


Conclusion:

Every day cannot be traded with the same strategy. An intraday trader must have the clarity that an opportunity can come on any trading technique and he/she should be ready to opt for the right trade opportunity.

Market Profile concept gives more clarity on how to identify and differentiate these trading opportunities very early using “Open-Types” and “Day-Structure” concepts.

A detailed study of the market profile will help and provides an edge in intraday trading.

I hope this detailed explanation helps!

Wednesday, 4 November 2020

Redis Object Caching and Fast CGI Page Caching

Object Cache

An object cache stores database query results so that instead of running the query again the next time the results are needed, the results are served from the cache. This greatly improves the performance of WordPress as there is no longer a need to query the database for every piece of data required to return a response.

Redis is the latest and greatest when it comes to object caching. However, popular alternatives include Memcache and Memcached.


To install Redis, issue the following commands.

sudo apt install redis-server
sudo service php7.4-fpm restart


In order for WordPress to use Redis as an object cache, you need to install a Redis object cache plugin. Redis Object Cache by Till Krüss is a good choice.

Once installed and activated, go to Tools > Redis to enable the object cache.

This is also the screen where you can flush the cache if required.


The benefit of object caching can be seen when you look at the average database query time, which has decreased from 2.1ms to 0.3ms. The average query times were measured using Query Monitor.

In order to see a big leap in performance and a big decrease in server resource usage, we must avoid a MySQL connection and PHP execution altogether.


Page Cache

Although an object cache can go a long way to improving your WordPress site’s performance, there is still a lot of unnecessary overhead in serving a page request. For many sites, content is rarely updated. It’s therefore inefficient to load WordPress, query the database and build the desired page on every single request. Instead, you should serve a static HTML version of the requested page.

Nginx allows you to automatically cache a static HTML version of a page using the FastCGI module. Any subsequent requests to the page will receive the cached HTML version without ever hitting PHP or MySQL.


Step 1: Edit the Nginx Main Configuration File

Edit Nginx main configuration file.

sudo nano /etc/nginx/nginx.conf

In the http context, add the following 2 lines:

fastcgi_cache_path /etc/nginx/cache levels=1:2 keys_zone=phpcache:100m max_size=10g inactive=60m use_temp_path=off;
fastcgi_cache_key "$scheme$request_method$host$request_uri";

The first directive fastcgi_cache_path creates a FastCGI cache. This directive is only available under the http context of an Nginx configuration file.

  • The first argument specifies the cache location in the file system (/etc/nginx/cache/).
  • The levels parameter sets up a two-level directory hierarchy under /etc/nginx/cache/. Having a large number of files in a single directory can slow down file access, so I recommend a two-level directory for most deployments. If the levels parameter is not included, Nginx puts all files in the same directory. The first directory uses one character in its name. The sub-directory uses two characters in its name.
  • The 3rd argument specifies the name of the shared memory zone name (phpcache) and its size (100M). This memory zone is for storing cache keys and metadata such as usage times. Having a copy of the keys in memory enables Nginx to quickly determine if a request is a HIT or MISS without having to go to disk, greatly speed up the check. A 1MB zone can store data for about 8,000 keys, so the 100MB zone can store data for about 800,000 keys.
  • max_size sets the upper limit of the size of the cache (10GB in this example). If not specified, the cache can use all remaining disk space. Once cache reaches its maximum size, Nginx cache manager will remove the least recently used files from the cache.
  • Data which has not been accessed during the inactive time period (60 minutes) will be purged from the cache by the cache manager, regardless of whether or not it has expired. The default value is 10 minutes. You can also use values like 12h (12 hours) and 7d (7 days).
  • Nginx first writes files that are destined for the cache to a temporary storage area (/var/lib/nginx/fastcgi/). use_temp_path=off tells Nginx to write them directly to the final cache directory to avoid unnecessary copying of data between file systems.

The 2nd directive fastcgi_cache_key defines the key for cache lookup. Nginx will apply a MD5sum hash function on the cache key and uses the hash result as the name of cache files. After entering the two directives in the http context, save and close the file.


Step 2: Edit Nginx Server Block

Then open your server block configuration file.

sudo nano /etc/nginx/conf.d/your-domain.conf OR directly in tinycp Web >> domain >> your domain >>custom config

Scroll down to the location ~ \.php$ section. Add the following lines in this section.

location ~ \.php$ {

fastcgi_cache phpcache; fastcgi_cache_valid 200 301 302 60m; fastcgi_cache_use_stale error timeout updating invalid_header http_500 http_503; fastcgi_cache_min_uses 1; fastcgi_cache_lock on; add_header X-FastCGI-Cache $upstream_cache_status;

}
  • The fastcgi_cache directive enables caching, using the memory zone previously created by fastcgi_cache_path directive.
  • The fastcgi_cache_valid sets the cache time depending on the HTTP status code. In the example above, responses with status code 200, 301, 302 will be cached for 60 minutes. You can also use time period like 12h (12 hours) and 7d (7 days).
  • Nginx can deliver stale content from its cache when it can’t get updated content from the upstream PHP-FPM server. For example, when MySQL/MariaDB database server is down. Rather than relay the error to clients, Nginx can deliver the stale version of the file from its cache. To enable this functionality, we added the fastcgi_cache_use_stale directory.
  • fastcgi_cache_min_uses sets the number of times an item must be requested by clients before Nginx caches it. Default value is 1.
  • With fastcgi_cache_lock enabled, if multiple clients request a file that is not current in the cache, only the first of those requests is allowed through to the upstream PHP-FPM server. The remaining requests wait for that request to be satisified and then pull the file form the cache. Without fastcgi_cache_lock enabled, all requests go straight to the upstream PHP-FPM server.
  • The 3rd line adds the X-FastCGI-Cache header in HTTP response. It can be used to validate whether the request has been served from the FastCGI cache or not.

Now save and close the server block configuration file. Then test your Nginx configuration.

sudo nginx -t

If the test is successful, reload Nginx.

sudo service nginx reload

or

sudo systemctl reload nginx

The cache manager now starts and the cache directory (/etc/nginx/cache) will be created automatically.

Testing Nginx FastCGI Cache

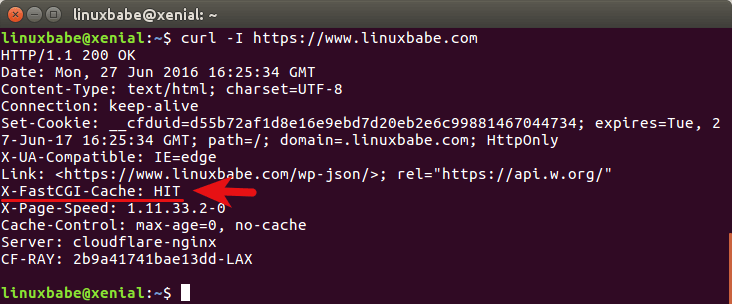
Reload your site’s home page for a few times. Then use curl to fetch the http response header.

curl -I http://www.your-domain.com

Like this:

nginx fastcgi cache test

Take a look at the X-FastCGI-Cache header. HIT indicates the response was served from cache.

Stuff that Should not be Cached

Login session, user cookie, POST request, query string, WordPress back-end, site map, feeds and comment author should not be cached. To disable caching for the above items, edit your server block configuration file (Or directly in tinycp Web >> domain >> your domain >>custom config ). Paste the following code into the server context, above the location ~ \.php$ line.

set $skip_cache 0;

# POST requests and urls with a query string should always go to PHP
if ($request_method = POST) {
    set $skip_cache 1;
}
if ($query_string != "") {
    set $skip_cache 1;
}

# Don't cache uris containing the following segments
if ($request_uri ~* "/wp-admin/|/xmlrpc.php|wp-.*.php|^/feed/*|/tag/.*/feed/*|index.php|/.*sitemap.*\.(xml|xsl)") {
    set $skip_cache 1;
}

# Don't use the cache for logged in users or recent commenters
if ($http_cookie ~* "comment_author|wordpress_[a-f0-9]+|wp-postpass|wordpress_no_cache|wordpress_logged_in") {
    set $skip_cache 1;
}


Save and close the file. Then test Nginx configurations.

sudo nginx -t

If the test is successful, reload Nginx.

sudo systemctl reload nginx

Now its done

Tuesday, 22 September 2020

रॉबर्ट कियोसाकी यांचा श्रीमंतीचा मंत्र

  1.  तुमचे यश हे तुमच्या इच्छा आकांक्षांवर तसेच तुम्ही जीवनात पाहिलेल्या मोठ्या स्वप्नांवरच नेहमी अवलंबून असते
  2.  आपल्याकडील मालमत्ता आणि आपली जबाबदारी या दोहोंतला फरक ज्यावेळी आपल्याला कळतो, तेव्हाच खरे शहाणपण येते. आपल्या मालमत्तेकडून आपल्याला या ना त्या प्रकारे पैसा मिळतच असतो, तर आपल्याला आपल्या जबाबदारीसाठी पैसा हा खर्च करावाच लागतो. श्रीमंत माणसाला या दोहोंतला फरक चांगल्यापैकी कळलेला असतो
  3.  पैशासाठी काम करू नका, तर स्वतःसाठी काम करा. आपला विकास साधा. विकासाच्या वाटेवर पैसा हा आपोआपच आपल्या मागे येत राहतो
  4.  तुम्ही आज जे काही करणार आहात त्यावरच तुमचा उद्या म्हणजेच तुमचे उज्ज्वल भविष्य उभे राहणार आहे.
  5.  आपल्याला आजवर जे सल्ले मिळाले ते पैसे वाचावा, कर्जातून मुक्त व्हा, दीर्घ गुंतवणूक करा, तसेच काही पैसे गोरगरिबांना द्या ई. तुम्हाला जर श्रीमंत व्हायचे असेल तर या सर्वांकडे दुर्लक्ष करायला शिका.
  6.  व्यवसायातील कंपनीची स्थिती-गती, म्हणजेच कंपनीची मालमत्ता आणि नफा, या दोन गोष्टी सर्वार्थाने महत्वाच्या असतात. श्रीमंत माणूस हा एकूण मालमत्तेच्या हिशोबात बोलत असतो, तर गरीब माणूस रोजच्या नफ्यात अडकलेला असतो. एकूणच दोघांची प्रकृती, पिंड आणि स्वभाव वेगवेगळा असतो, आणि आयुष्याच्या मागण्याही.
  7.  पैसे मिळविण्याची प्रक्रिया तीन दिशांची असते. प्रथम तुम्हाला पैसा कसा मिळवावा हे कळायला हवे, मग तुम्हाला त्याची व्यवस्था नीट लावता यायला हवी, आणि मुख्य म्हणजे तुम्हाला त्यातील काही पैशांची बचतही करता आली पाहिजे.
  8.  तुमचे मन हे तुमचे मोठे भांडवल आहे, त्यात योग्य विचारांचीच भरती करा. योग्य ठिकाणी योग्य विचार तुम्हाला करता आला पाहिजे.
  9.  तुम्हाला ज्याची भीती वाटते किंवा ज्याविषयी तुम्ही विलक्षण साशंक आहात अशांना स्वच्छ मानाने मोकळेपणाने भेटा
  10.  जे काही करायचे ते आज करा, उद्या नको. विजेते नेहमीच आज हा शब्द वापरतात आणि झटपट कृती करतात पण जे पराभूत असतात वा भीतीग्रस्त असतात ते नेहमीच उद्या या शब्दाला अपार महत्व देतात.
  11.  मोठी-महान स्वप्ने पाहायला विसरू नका. विचार करताना दीर्घ काळाचा विचार करा, आणि त्यासाठी पहिले पाऊल आजच उचला. पावलापावलांनी पुढे जात रहा, तुमच्या छोट्या छोट्या कृतीच तुम्हाला मोठे यश मिळवून देणार आहेत.
  12.  बहुतेक लोक श्रीमंत होऊ शकत नाहीत कारण आपल्या समोर जी मोठी संधी उभी आहे, ती ओळखण्यासाठी ते पुरेसे प्रशिक्षित झालेले नसतात. श्रीमंत मात्र जीवनात भेटणाऱ्या प्रत्येक संधीचा क्षणाचा लाभ उठवतात. इतकेच नव्हे तर ते काही क्षणात संधी निर्माण करतात.
  13.  काळ बदलत असतो, आपल्या अवतीभोवतीही खूप बदल होत असतात. पण हे बदल एकतर आपल्याला दिसत नाहीत किंवा ते आपल्या मुठीत पकडता येत नाही. आपण या बदलांना प्रवाही वृत्तीने सामोरे जायला हवे. तरच प्रगती शक्य आहे.
  14.  योग्य व नेमके नेतृत्व हे आज आवश्यकच नाही तर अपरिहार्य झाले आहे. कुशल नेतृत्वाअभावी काहीच शक्य नाही. अगदी रोजचे प्रोडक्शनही. आज अनेक कारखाने बंद पडले आहेत ते केवळ कुशल नेतृत्वाच्या अभावीच. असे अकुशल नेतृत्व हे आपल्या अपयशाचे खापर नेहमीच दुसऱ्याच्या डोक्यावर थापत असते.
  15.  श्रीमंत आणि गरीब माणूस दोघेही वेळेचा वेगवेगळा वापर करतात. जो माणूस अत्यंत गरीब, अस्वस्थ तसेच अत्यंत दुःखही असतो तो नेहमीच उद्या या शब्दाचा वारंवार वापर करतो. कारण तो आज खऱ्या अर्थाने जगात नसतो. तो नेहमीच उद्यात जगात असतो. कारण या उद्याच्या त्याची अशा लपलेली असते.
  16.  श्रीमंत होण्याचा सर्वात चांगला मार्ग म्हणजे व्यवसायिक व्हा. व्यवसाय सुरु केल्यानंतर भक्कम कॅशफ्लो उभा राहिला कि त्यानंतर इतर मालमत्तेत गुंतवणूक सुरु करा
  17.  तुम्ही पैशासाठी काम करण्याऐवजी पैसा तुमच्यासाठी काम कसा करेल, हे शिका
  18.  विचार करणं हे सर्वात कठीण काम आहे, म्हणून फार थोडे लोक विचार करतात
  19.  तुम्हाला तुमच्याकडची कौशल्य श्रीमंत बनवतात, पुस्तकी ज्ञान नाही
  20.  आपण सारे जन्मजात विक्रेते असतो
  21.  विक्री करता येणे हे धंद्यातले प्रथम क्रमांकाचे कौशल्य आहे
  22.  मी नाकारलं जाण्याची जेवढी जोखीम घेईल तेवढाच मी स्वीकारला जाण्याची शक्यता जास्त असते
  23.  स्थावर मालमत्ता हि विकण्यासाठी विकत घ्यायची नसते. उत्पन्न निर्माण करणारी मालमत्ता उभारण्यासाठी स्थावर मालमत्ता विकत घ्यायची असते
  24.  तुम्हाला कायम उत्पन्न देत राहतील अशा संपत्ती निर्माण करा.

Sunday, 2 August 2020

व्यवसायातील अर्थगणित

१. तुमच्या व्यवसायातुन तुमचा स्वतःचा पगार वजा करता नफ्याच्या रुपात काही शिल्लक रहात असेल तर तुम्ही व्यवसाय करत आहात, जर पगार वजा जाता काहीच शिल्लक रहात नसेल तर तुम्ही स्वयंरोजगारात आहात... जर सगळ्यांची देणी देऊन तुम्हाला तुमचा पगार सुद्धा निघत नसले तर तुम्ही स्वयंरोजगारातही नसून, फक्त मजुरी करत आहात असा अर्थ निघतो...


२. जर पगार वजा जाता काही शिल्लक रहात असेल पण तो नफा व्यवसायातील गुंतवणुकीवर १२% प्रतिवर्ष व्याज पकडुन तीन वर्षात गुंतवणुक वसुल करण्यासाठी कमी पडत असेल तर तुमचा व्यवसाय टेक्नीकली तोट्यात चालला आहे असे समजावे. सोप्या आकडेवारीत सांगायचं म्हटलं तर महीन्याला गुंतवणुकीच्या 3.80-४% उत्पन्न निव्वळ नफा म्हणुन हाती‌ आले‌ पाहीजे.


३. जर तुमचा‌ व्यवसाय ३ वर्षांपेक्षा जुना असेल, गुंतवणुक वसुल झालेली असेल, किंवा पारंपारीक‌ व्यवसाय असेल, तर अशावेळी तो सेटअप उभा करण्यासाठी‌ आज किती खर्च‌ येऊ शकतो याचा अंदाज‌ घेऊन त्यानुसार महीन्याला किमान किती उत्पन्न मिळाले पाहीजे याचा‌ हिशेब करु शकता. अशा प्रकारात त्या अंदाजे गुंतवणुकीच्या किमान २% निव्वळ उत्पन्न महिन्याला हाती आले पाहिजे. जर व्यवसायाची उलाढाल प्रत्येक महिन्याला होणे शक्य नसेल, म्हणजे पेमेंट २-३ महिन्याला मिळत असतील किंवा वर्षातून काही महिने जास्त आणि काही महिने कमी उलाढालीचे असतील तर ३-६-९ महिन्यांच्या किंवा अगदी वर्षभराच्या उलाढालीच्या व उत्पन्नाच्या हिशोबाची सरासरी काढावी.


४. महीन्याला किती‌ उत्पन्न मिळेल याचा विचार करुन व्यवसाय सुरु करायचा नसतो, मार्केटमधे कशाची‌ गरज आहे, आपल्याा काय ‌जमू शकतं, आपल्या अवाक्यात काय आहे हे पाहूनच व्यवसाय सुरु करायचा असतो. व्यवसायात‌ कोणत्याही‌ फिक्स‌ उत्पन्नाची अपेक्षा ठेऊ नये, दोन सारखाच व्यवसाय करणाऱ्या आणि सारखेच सेटअप असणाऱ्या व्यावसायिकांचे उत्पन्न वेगवेगळेच असते. पण तुम्ही जी गुंतवणुक‌‌ करत आहात तीच्या‌ प्रमाणात‌ किमान उत्पन्न आले पाहिजे असा‌ तुमचा प्रयत्न असायलाच हवा.


व्यवसायातून उत्पन्न मिळतंच असतं. व्यवसाय विनाउत्पन्नाचा नसतो. त्यामुळे जी गोष्ट व्यवसायाचा अविभाज्य भाग आहे तिचे प्रमाण जाणून घेण्याची गरज नसते. उत्पन्नाचे प्रमाण हे नेहमीच उलाढालीवर आणि ग्राहकांवर ठरत असते..


गुंतवणुकीच्या प्रमाणात किमान किती उत्पन्न मिळायला हवे आणि महीन्याला किती मिळतील हा प्रश्न या दोन वेगवेगळ्या बाबी आहेत. पहिला प्रश्न टेकनीकल आणि आकडेवारीवर अधारीत आहे तर दुसरा प्रश्न व्यवसायात यायचंय पण नोकरीप्रमाणे फिक्स उत्पन्न पाहिजे असा मानसिकतेचा आहे.


(यासंबंधी 'व्यवसायातील अर्थशास्त्र' या नावाने काही महिन्यांपूर्वी काही स्लाईड्स पब्लिश केलेल्या आहेत, त्यातही बरीच सविस्तर माहिती दिलेली आहे.)


व्यवसाय साक्षर व्हा...

Monday, 27 July 2020

Wordpress Required PHP Extensions

 
Following are extensions required by wordpress,
 
  1. php-curl
  2. php-gd
  3. php-intl
  4. php-mbstring
  5. php-soap
  6. php-xml
  7. php-xmlrpc
  8. php-zip

Install PHP 7.4 php-fpm on Ubuntu and Debian


Start with adding the repository kindly provided by sury.org

sudo apt-get install apt-transport-https -y
sudo wget -O /etc/apt/trusted.gpg.d/php.gpg https://packages.sury.org/php/apt.gpg
echo "deb https://packages.sury.org/php/ stretch main" | sudo tee /etc/apt/sources.list.d/php.list
 

Update your package list

sudo apt-get update
 

Install the PHP 7.4 packages for nginx and php-fpm functionality

sudo apt-get install php7.4-cli php7.4-curl php7.4-mysql php7.4-fpm php7.4-gd php7.4-xml php7.4-mbstring php7.4-zip php7.4-soap php7.4-dev -y
 

Now we can update the PHP command line binary shorthand php to use the PHP 7.4 CLI binary.

Sunday, 26 July 2020

Best Nginx Caching For Wordpress

In below code you will find Nginx caching and Wordpress permalink.
 
 
try_files $uri $uri/ /index.php?$args;

gzip on;
gzip_disable "msie6";
gzip_vary on;
gzip_proxied any;
gzip_comp_level 6;
gzip_buffers 16 8k;
gzip_http_version 1.1;
gzip_types application/javascript application/rss+xml application/vnd.ms-fontobject application/x-font application/x-font-opentype application/x-font-otf application/x-font-truetype application/x-font-ttf application/x-javascript application/xhtml+xml application/xml font/opentype font/otf font/ttf image/svg+xml image/x-icon text/css text/javascript text/plain text/xml;

location ~* \.(?:ico|css|js|gif|jpe?g|png|woff|ttf|otf|svg|woff2|eot)$ {
# Some basic cache-control for static files to be sent to the browser
expires 30d; # or use max
add_header Pragma public;
add_header Cache-Control "public, must-revalidate, proxy-revalidate";
}
 
client_max_body_size 100M;
access_log off;

Wednesday, 8 February 2017

How to Control Your Mouse Cursor With Your Keyboard

  1. Go to your Start Menu And Open Control Panel
  2. In The Control Panel Go To “Ease of Access”
  3. Now click “Change how your mouse works”
  4. Now Click on Set up Mouse Keys
  5. Now Tick the “Turn on Mouse keys” and “turn on mouse keys with leftALT+LeftShift+NUM LOCK”
  6. Now turn the pointer speed full
  7. Tick hold Down ctrl to speed up and shift to slow
  8. In Other setting turn It ON
  9. Click on Apply And Click on Ok You need to click ok again
  10. You can see a Mouse like Icon in system tray double click on it
  11. Control Panel Will Open And click ok
  12. Thats All You Can Control Your Cursor With hold ctrl +1 to 9 button

Monday, 30 January 2017

How To Connect Two Routers

  1.  Make note of the first router IP address range and DHCP pool. Check what wireless channel it is using.
  2. Make sure DHCP pool is not "everything", like 192.168.1.100 to 192.168.1.200 is fine for example... Router#1 should be at 192.168.1.1 in this example (yours may be different)
  3. Log into second router from computer via wired connection. Turn off it's DHCP. Set it's address to 192.168.1.2, gateway 192.168.1.1 (first router), same netmask.
  4. Change #2 router's wireless channel to something different than first. Use channels 1,6 or 11. Change the SSID as well. These steps make each AP different for now, to be able to test if everything works ok.
  5. Power cycle #2 router, then plug cable from LAN port to LAN port of #1 router. Do not use WAN port, you are using #2 router as a switch/Wireless device only.
  6. Plug PC back into #2, and note that your IP address is from DHCP pool on #1 router - that means the network is working.
  7. Connect to second router wireless, to verify it works.

After all this works, you can experiment with the wireless being the same SSID and channel, to allow roaming. Some routers do it well, others argue with each other. So, it may end up that you have to keep separate channels and connection profiles for each router access...

All IP addresses are examples. Yours may be similar but different, like 192.168.0.1 or 192.168.2.1

WDS is also an option like others say. However, your wireless bandwidth may be less than regular wireless. How it works may depend on the router and what Internet bandwidth you have (WDS will slow down a high speed internet (20mbps+) connection)

Sunday, 29 January 2017

Changing The Color Of Each Nav Menu Item in Wordpress

The WordPress navigation menus take up a large chunk of CSS in your themes style.css file making it one of the most challenging elements to customize. With that in mind, i’m simply going to provide the exact code i used on this site and then explain a bit about each part.


Add CSS Classes

  1. The first step is to go to Appearance > Menus and click the Screen Options tab located in the top right hand corner of the Edit Menu screen.
  2. Check the CSS Classes box under Show advanced menu properties.
  3. Next step is to add a unique name to the CSS classes field for each menu item.  
  4. Once you’ve added the new classes for each item, you can then use those classes to style each one in your child themes.style.css file.


Style Sheet CSS Code

Here’s the code i used to style different classes of the primary nav menu.
Note: CSS code changes may not show up immediately due to browser & server side caching.
/**
* @author Hackkode
* @url http://hackkode.com
*/

.home-nav {
    background: #0F222E;
}

.menu-primary li.home-nav a:hover {
    background: #fff;
 color: #333;
}

.beg-vid-nav {
    background: #1A3A4F;
}

.menu-primary li.beg-vid-nav a:hover {
    background: #fff;
 color: #333;
}

.set-word-nav {
    background: #265573;
}

.menu-primary li.set-word-nav a:hover {
    background: #fff;
 color: #333;
}

.inst-word-nav  {  
background: #386D73;
}

.menu-primary li.inst-word-nav a:hover {
    background: #fff;
 color: #333;
}

.tools-nav {  
background: #81A68A;
}

.menu-primary li.tools-nav a:hover {
    background: #fff;
 color: #333;
}

.contact-nav {  
background: #9FBF8F;
}

.menu-primary li.contact-nav a:hover {
    background: #fff;
 color: #333;
}

.blog-nav {  
background: #D4D9B0;
}

.menu-primary li.blog-nav a:hover {
    background: #fff;
 color: #333;
}

.nav-primary a:hover, .nav-primary .current-menu-item > a {
    color: #333;
 background: #fff;
}

.menu-primary a:hover {
-webkit-box-shadow: 5px 5px 5px rgba(50, 50, 50, 50);
-moz-box-shadow:    5px 5px 5px rgba(50, 50, 50, 50);
box-shadow:         5px 5px 5px rgba(50, 50, 50, 50);
}

.menu-primary a, .menu a {
color: #fff;
}

.genesis-nav-menu .sub-menu a {
color: #333;
}

What Each Class Does

.home-nav – This is the unique class you can add to each menu item and use to style the static appearance of each menu item. In this case, its used to change the background color of each item. It changes when hovered using another class.

.menu-primary li.home-nav a:hover – These classes include both the custom classes added to each menu item and classes for which target the primary menu only. They also include the class which effects the hover color. In this case the hover color is set to white(#fff) for every item and the text color changes on hover to a dark grey(#333).
Each menu item includes the above styling.

.nav-primary a:hover, .nav-primary .current-menu-item > a – These classes effect the primary nav menu color for each item when the page is visited. They change the background color of each item to white and the text color to grey when the reader is on a page which is included in the nav menu.

.menu-primary a:hover – This CSS only effects each item when hovered over. In this code it adds a box shadow effect to each item.

.menu-primary a, .menu a – These classes only effect the static text color which i have changed to white.
No doubt there’s a lot more you can do to style each of your nav menu items using custom classes in your themes style sheet.

Here’s a few color tools you might like to use to choose which colors for each item.

Tuesday, 24 January 2017

Free Fast Public DNS Server for Faster Internet Browsing Experience

Contents

Domain Name System (DNS) is a database system which translates a domain name (which can be remembered easily) into an IP address used by computers for communicating to each other, for example when we put the address of GetDriver.com in a browser, that address will be translated to 74.220.212.122 by DNS server. The translating process from a domain’s name to be an IP address takes a time, so the faster DNS that you use, the faster this process will be.
Many internet providers provide free public DNS Server but only few ones are fast. I have already tried several free public DNS Server from some world-class providers and I can feel the difference, web browsing is faster and more responsive.

These are the lists of 18 free fast public DNS Servers that I recommend you to use:


Google DNS

Google Public DNS IP Addresses:
  • 8.8.8.8
  • 8.8.4.4


Level(3) Communications

Verizon / Level(3) Public DNS IP Addresses:
  • 4.2.2.1
  • 4.2.2.2
  • 4.2.2.3
  • 4.2.2.4
  • 4.2.2.5
  • 4.2.2.6
  • 209.244.0.3
  • 209.244.0.4


DNS Advantage

DNS Advantage Public DNS IP Addresses:
  • 156.154.70.1
  • 156.154.71.1


Open DNS

Open DNS Public DNS IP Addresses:
  • 208.67.222.222
  • 208.67.220.220


Comodo Secure DNS

Comodo Secure DNS Public DNS IP Addresses:
  • 8.26.56.26
  • 8.20.247.20


DNS.WATCH

DNS.WATCH Public DNS IP Addresses:
  • 84.200.69.80
  • 84.200.70.40


OpenNIC

Are you looking for an alternative DNS provider that is open and democratic, are you concerned about censorship? OpenNIC Public DNS IP Address:
  • Automatically detect your nearest OpenNIC DNS servers: Click here


SmartViper

SmartViper Public DNS IP Addresses:
  • 208.76.50.50
  • 208.76.51.51


FreeDNS.zone

No DNS redirects. No logging. Use the internet without restrictions. Protect your privacy. FreeDNS.zone Public DNS IP Addresses:
  • 37.235.1.174
  • 37.235.1.177


Hurricane Electric

Hurricane Electric is a Internet Backbone and Colocation Provider. Hurricane Electric Public DNS IP Address:
  • 74.82.42.42


Norton (DNS for home)

Norton Public DNS IP Addresses:
Norton DNS For home provides three types of DNS with different filtering features.
  • Security (Malware, phishing sites and scam sites)
    • 199.85.126.10
    • 199.85.127.10
  • Security + Pornography
    • 199.85.126.20
    • 199.85.127.20
  • Security + Pornography + Non-Family Friendly
    • 199.85.126.30
    • 199.85.127.30


Verisign

Verisign Public DNS IP Addresses:
  • 64.6.64.6
  • 64.6.65.6


GreenTeamDNS

GreenTeamDNS Public DNS IP Addresses:
  • 81.218.119.11
  • 209.88.198.133


SafeDNS

SafeDNS Public DNS IP Addresses:
  • 195.46.39.39
  • 195.46.39.40


Dyn

Dyn Public DNS IP Addresses:
  • 216.146.35.35
  • 216.146.36.36


Alternate DNS

Alternate DNS Public DNS IP Addresses:
  • 198.101.242.72
  • 23.253.163.53


Yandex.DNS

Yandex.DNS Public DNS IP Addresses:
Yandex.DNS provides three modes of DNS with different filtering features. Yandex.DNS’ speed is the same in all three modes.
  • Basic (No traffic filtering)
    • 77.88.8.8
    • 77.88.8.1
  • Safe (Protection from infected and fraudulent sites)
    • 77.88.8.88
    • 77.88.8.2
  • Family (Protection from dangerous sites and blocks sites with adult content)
    • 77.88.8.7
    • 77.88.8.3


Censurfridns.dk

Censurfridns.dk Public DNS IP Addresses:
  • 91.239.100.100
  • 89.233.43.71

Monday, 23 January 2017

How to Spoof MAC Address on Android Phones [Rooted]

Spoofing MAC Address on Android Devices

Even though MAC address is embedded on the hardware device during manufacture, it can still be spoofed to input a new one of your choice. Here is a detailed instruction on how to spoof MAC address on your Android phone.

Before you spoof the MAC address, you need to record the original/current MAC address of your device which can be done according to the instruction below:

  • On the Home Screen of your phone, tap Menu button and go to Settings.
  • Tap About Device and go to Status
  • Now scroll down to record the 12-digit code shown under Wi-Fi Mac address. An address would read something like:
    Example MAC address: E5:12:D8:E5:69:97

Requirements for Spoofing the MAC Address

  1. Rooted Android Phone
  2. BusyBox app installed on your phone
  3. Once BusyBox is installed, you need to install Terminal app

Once the above requirements are satisfied, follow the instructions below to spoof your MAC address:

Open the Terminal app and type the commands as listed below:

$ su [HIT ENTER]

$ busybox iplink show eth0 [HIT ENTER]

(This will show your current MAC address, just for your confirmation)

Now, type the following command:

$ busybox ifconfig eth0 hw ether XX:XX:XX:XX:XX:XX [HIT ENTER]

(In the above command, replace XX:XX:XX:XX:XX:XX with your new MAC address)

You have now spoofed your MAC address successfully. To check for the change enter the following command again:

$ busybox iplink show eth0 [HIT ENTER]
(Now you should see your new MAC address)

How to Allow Apps from Anywhere in macOS Sierra Gatekeeper

One of the major changes in the macOS Sierra Public Beta isn’t an obvious one, and you may not encounter it until you try to install an app that you didn’t buy from the App Store.
 

Note: This article was written for people using the Sierra Public Beta. When Apple released the final version of Sierra, it reverted the settings back to the way it works in El Capitan.


First, how it works in El Capitan

To understand the changes, let’s look at what was offered before Sierra. Previously (or currently, if you’re not running Sierra), in El Capitan. the setting looked like this.


In El Capitan, you have the option to allow apps that you downloaded from the internet, without any intervention from the operating system.

“Allow apps downloaded from” has three settings:

  • Mac App Store: The Mac will only run apps downloaded from the Mac App Store.
  • Mac App Store and identified developers: When you try to open a new app and it’s not on the list of identified developers that’s saved within the operating system, the Mac tells you it can’t open it. To open the app, you have to go to System Preferences > Security & Privacy, and click the Open Anyway button that appears in the General tab.
  • Anywhere: You’ll see a notification that says the new app you want to open was downloaded from the internet, and you need to confirm that you want to open it.
 

How to Allow Apps from Anywhere in Gatekeeper for macOS Sierra

    1. Quit out of System Preferences
    2. Open the Terminal app from the /Applications/Utilities/ folder and then enter the following command syntax:

sudo spctl --master-disable

    1. Hit return and authenticate with an admin password
    2. Relaunch System Preferences and go to “Security & Privacy” and the “General” tab
    3. You will now see the “Anywhere” option under ‘Allow apps downloaded from:’ Gatekeeper options

You’ll now be able to open and launch apps from anywhere under macOS Sierra, but be forewarned this turns off Gatekeeper and is not recommended for the vast majority of Mac users. Allowing apps from anywhere including unidentified developers can potentially leave a Mac vulnerable to certain malware and junkware and should be avoided by all Mac users with the exception of those with genuinely advanced abilities.

Sunday, 22 January 2017

The Best Sites to Learn Programming

If you are ready to take the plunge, here are some of the best websites that offer courses in a variety of programming languages for free. I have also added a list of companion ebooks that will give you a more in-depth understanding of the language and they don’t cost anything either.

 
  Online Courses & Screencasts Programming Books (Free)
JavaScript Code Academy, Learn Street, Code Combat, Code Avengers Eloquent JavaScript, JavaScript Guide, Speaking JS, JS The Right Way, Oh My JS, Canvassing
HTML & CSS Code Academy, Don’t Fear The Internet, Tutsplus, Learn Layout, A to Z CSS, Dash, Web Accessibility, The Hello World, Khan Academy, HTML5 from Scratch Mozilla, Dive into HTML5, 20 Things I Learned, HTML Dog, HTML & CSS, HTML5 for Designers, DOM Enlightenment, HTML Canvas
jQuery Code Academy, Tutsplus, Code School jQuery Fundamentals, Learn jQuery
Python Code Academy, Google, Learn Street, Python Tutor, IHeartPY Python for You and Me,  Dive into Python, Learn Python the Hard Way, Think Python, Python for Fun, Tango with Django, Django
Ruby & Ruby on Rails Code Academy, TryRubyCode Learn, Railscasts, Rubymonk, Learn Street Why’s (Poignant) Guide to Ruby, Learn Ruby the Hard Way, Learn to Program, Learn Rails by Example
PHP Code Academy PHP Programming, Practical PHP
Also see: How to Learn Regular Expressions (RegEx)
Google Apps Script Getting Started, Office Hours, Google Scripts Examples, Learning Apps Script
WordPress Treehouse, WordPress TV
Linux & Shell Scripting Stanford.edu, Explain Shell Conquer the Command Line
Node.js Nodetuts, Node School The Node Beginner Book, Mixu’s Node book, Node Up and Running, Mastering Node.js
Angular JS Code School, Egg Head, Learn Angular Angular JS Tutorial, Thinking Angular, Angular Tutorial, Getting Started (Adobe)
Also see: Learn Touch Typing & Code Faster
Git (version control) Code School, Git Immersion, GitHub Training, Udacity Pro Git, Learn Git, Gists in Github
Objective-C (iOS & Mac) Code School, Stanford, iTunesU
Chrome Dev Tools Code School, Dev Tools Secret, Chrome Dev Tools Tutorial, Udacity, Building Browser Apps
Go Language Golang.org, GopherCasts Programming in Go, Go by Example, Learning Go, Building Web Apps with Go, Learning Go
Java Learn Java, Coding Bat, Java Udemy, Learneroo Programming in Java, Thinking in Java, O’Reilly Learning Java, Think Java, Java & CS, Java for Python Devs
Android App Development Udacity (Google Developers), Coursera, The New Boston, Google University, App Development Essentials, Code Learn, App Inventor (Visual)
D3 (data visualization) Data Visualization for the Web, Dashing D3, D3 Tips & Tricks
Also see: Learn VIM, the text editor for programmers
SQL (Databases) SQL Zoo, SQL @Stanford, Essential SQL, SQL for Nerds, Intro to SQL, SQL Bolt, PHP & MySQL
Everything Else Udacity, edX.org, Coursera, Udemy$, Lynda$, Pluralsight$, Treehouse$, Open Consortium, One Month Rails$

Configure your network settings to use Google Public DNS

When you use Google Public DNS, you are changing your DNS "switchboard" operator from your ISP to Google Public DNS.

In most cases, the IP addresses used by your ISP's domain name servers are automatically set by your ISP via the Dynamic Host Configuration Protocol (DHCP). To use Google Public DNS, you need to explicitly change the DNS settings in your operating system or device to use the Google Public DNS IP addresses. The procedure for changing your DNS settings varies according to operating system and version (Windows, Mac or Linux) or the device (computer, phone, or router). We give general procedures here that might not apply for your OS or device; please consult your vendor documentation for authoritative information.


Important: Before you start

Before you change your DNS settings to use Google Public DNS, be sure to write down the current server addresses or settings on a piece of paper. It is very important that you keep these numbers for backup purposes, in case you need to revert to them at any time.

We also recommend that you print this page, in the event that you encounter a problem and need to refer to these instructions.


Google Public DNS IP addresses

The Google Public DNS IP addresses (IPv4) are as follows:

  • 8.8.8.8
  • 8.8.4.4

The Google Public DNS IPv6 addresses are as follows:

  • 2001:4860:4860::8888
  • 2001:4860:4860::8844

You can use either address as your primary or secondary DNS server. You can specify both addresses, but do not specify the same address as both primary and secondary.

You can configure Google Public DNS addresses for either IPv4 or IPv6 connections, or both. For IPv6-only networks with a NAT64 gateway using the 64:ff9b::/96 prefix, you can use Google Public DNS64 instead of Google Public DNS IPv6 addresses, providing connectivity to IPv4-only services without any other configuration.

Some devices use separate fields for all eight parts of IPv6 addresses and cannot accept the :: IPv6 abbreviation syntax. For such fields enter:

  • 2001:4860:4860:0:0:0:0:8888
  • 2001:4860:4860:0:0:0:0:8844

Expand the 0 entries to 0000 if four hex digits are required.


Change your DNS servers settings

Because the instructions differ between different versions/releases of each operating system, we only give one version as an example. If you need specific instructions for your operating system/version, please consult your vendor's documentation. You may also find answers on our user group.

Many systems allow you to specify multiple DNS servers, to be contacted in a priority order. In the following instructions, we provide steps to specify only the Google Public DNS servers as the primary and secondary servers, to ensure that your setup will correctly use Google Public DNS in all cases.


Windows

DNS settings are specified in the TCP/IP Properties window for the selected network connection.

Example: Changing DNS server settings on Windows 7

  1. Go to the Control Panel.
  2. Click Network and Internet > Network and Sharing Center > Change adapter settings.
  3. Select the connection for which you want to configure Google Public DNS. For example:

    • To change the settings for an Ethernet connection, right-click Local Area Connection > Properties.
    • To change the settings for a wireless connection, right-click Wireless Network Connection > Properties.

    If you are prompted for an administrator password or confirmation, type the password or provide confirmation.

  4. Select the Networking tab. Under This connection uses the following items, select Internet Protocol Version 4 (TCP/IPv4) or Internet Protocol Version 6 (TCP/IPv6) and then click Properties.

  5. Click Advanced and select the DNS tab. If there are any DNS server IP addresses listed there, write them down for future reference, and remove them from this window.
  6. Click OK.
  7. Select Use the following DNS server addresses. If there are any IP addresses listed in the Preferred DNS server or Alternate DNS server, write them down for future reference.
  8. Replace those addresses with the IP addresses of the Google DNS servers:

    • For IPv4: 8.8.8.8 and/or 8.8.4.4.
    • For IPv6: 2001:4860:4860::8888 and/or 2001:4860:4860::8844.
    • For IPv6-only: you can use Google Public DNS64 instead of the IPv6 addresses in the previous point.
  9. Restart the connection you selected in step 3.

  10. Test that your setup is working correctly; see Test your new settings below.
  11. Repeat the procedure for additional network connections you want to change.


Mac OS

DNS settings are specified in the Network window.

Example: Changing DNS server settings on Mac OS 10.5

  1. Click Apple > System Preferences > Network.
  2. If the lock icon in the lower left-hand corner of the window is locked, click the icon to make changes, and when prompted to authenticate, enter your password.
  3. Select the connection for which you want to configure Google Public DNS. For example:
    • To change the settings for an Ethernet connection, select Built-In Ethernet, and click Advanced.
    • To change the settings for a wireless connection, select Airport, and click Advanced.
  4. Select the DNS tab.
  5. Click + to replace any listed addresses with, or add, the Google IP addresses at the top of the list:
    • For IPv4: 8.8.8.8 and/or 8.8.4.4.
    • For IPv6: 2001:4860:4860::8888 and/or 2001:4860:4860::8844.
    • For IPv6-only: you can use Google Public DNS64 instead of the IPv6 addresses in the previous point.
  6. Click Apply > OK.
  7. Test that your setup is working correctly; see Test your new settings below.
  8. Repeat the procedure for additional network connections you want to change.


Linux

In most modern Linux distributions, DNS settings are configured through Network Manager.

Example: Changing DNS server settings on Ubuntu

  1. Click System > Preferences > Network Connections.
  2. Select the connection for which you want to configure Google Public DNS. For example:
    • To change the settings for an Ethernet connection, select the Wired tab, then select your network interface in the list. It is usually called eth0.
    • To change the settings for a wireless connection, select the Wireless tab, then select the appropriate wireless network.
  3. Click Edit, and in the window that appears, select the IPv4 Settings or IPv6 Settings tab.
  4. If the selected method is Automatic (DHCP), open the dropdown and select Automatic (DHCP) addresses only instead. If the method is set to something else, do not change it.
  5. In the DNS servers field, enter the Google Public DNS IP addresses, separated by a comma:
    • For IPv4: 8.8.8.8 and/or 8.8.4.4.
    • For IPv6: 2001:4860:4860::8888 and/or 2001:4860:4860::8844.
    • For IPv6-only: you can use Google Public DNS64 instead of the IPv6 addresses in the previous point.
  6. Click Apply to save the change. If you are prompted for a password or confirmation, type the password or provide confirmation.
  7. Test that your setup is working correctly; see Test your new settings below.
  8. Repeat the procedure for additional network connections you want to change.

If your distribution doesn't use Network Manager, your DNS settings are specified in /etc/resolv.conf.


Example: Changing DNS server settings on a Debian server

  1. Edit /etc/resolv.conf:

     
    sudo vi /etc/resolv.conf
  2. If any nameserver lines appear, write down the IP addresses for future reference.

  3. Replace the nameserver lines with, or add, the following lines:

    For IPv4:

     
    nameserver 8.8.8.8
    nameserver
    8.8.4.4

    For IPv6:

     
    nameserver 2001:4860:4860::8888
    nameserver
    2001:4860:4860::8844

    For IPv6-only, you can use Google Public DNS64 instead of the above IPv6 addresses.

  4. Save and exit.

  5. Restart any Internet clients you are using.
  6. Test that your setup is working correctly; see Test your new settings below.

Additionally, if you are using DHCP client software that overwrites the settings in /etc/resolv.conf, you will need to set up the client accordingly by editing the client's configuration file.


Example: Configuring DHCP client sofware on a Debian server

  1. Back up /etc/resolv.conf:

     
    sudo cp /etc/resolv.conf /etc/resolv.conf.auto
  2. Edit /etc/dhcp3/dhclient.conf:

     
    sudo vi /etc/dhcp3/dhclient.conf
  3. If there is a line containing domain-name-servers, write down the IP addresses for future reference.

  4. Replace that line with, or add, the following line:

    For IPv4:

     
    prepend domain-name-servers 8.8.8.8, 8.8.4.4;

    For IPv6:

     
    prepend domain-name-servers 2001:4860:4860::8888, 2001:4860:4860::8844;

    For IPv6-only, you can use Google Public DNS64 instead of the above IPv6 addresses.

  5. Save and exit.

  6. Restart any Internet clients you are using.
  7. Test that your setup is working correctly; see Test your new settings below.


Routers

Every router uses a different user interface for configuring DNS server settings; we provide only a generic procedure below. For more information, please consult your router documentation.

To change your settings on a router:

  1. In your browser, enter the IP address to access the router's administration console.
  2. When prompted, enter the password to access network settings.
  3. Find the screen in which DNS server settings are specified.
  4. If there are IP addresses specified in the fields for the primary and seconday DNS servers, write them down for future reference.
  5. Replace those addresses with the Google IP addresses:
    • For IPv4: 8.8.8.8 and/or 8.8.4.4.
    • For IPv6: 2001:4860:4860::8888 and/or 2001:4860:4860::8844.
    • For IPv6-only: you can use Google Public DNS64 instead of the IPv6 addresses in the previous point.
  6. Save and exit.
  7. Restart your browser.
  8. Test that your setup is working correctly; see Test your new settings below.

Some routers use separate fields for all eight parts of IPv6 addresses and cannot accept the :: IPv6 abbreviation syntax. For such fields enter:

  • 2001:4860:4860:0:0:0:0:8888
  • 2001:4860:4860:0:0:0:0:8844

Expand the 0 entries to 0000 if four hex digits are required.


Mobile or other devices

DNS servers are typically specified under advanced Wi-Fi settings. However, as every mobile device uses a different user interface for configuring DNS server settings, we provide only a generic procedure below. For more information, please consult your mobile provider's documentation.

To change your settings on a mobile device:

  1. Go to the screen in which Wi-Fi settings are specified.
  2. Find the screen in which DNS server settings are specified.
  3. If there are IP addresses specified in the fields for the primary and seconday DNS servers, write them down for future reference.
  4. Replace those addresses with the Google IP addresses:
    • For IPv4: 8.8.8.8 and/or 8.8.4.4.
    • For IPv6: 2001:4860:4860::8888 and/or 2001:4860:4860::8844.
    • For IPv6-only: you can use Google Public DNS64 instead of the IPv6 addresses in the previous point.
  5. Save and exit.
  6. Test that your setup is working correctly; see Test your new settings below.


Test your new settings

To test that the Google DNS resolver is working:

  1. From your browser, enter a hostname URL (such as http://www.google.com/). If it resolves correctly, bookmark the page, and try accessing the page from the bookmark.

    If all of these tests work, everything is working correctly. If not, go to step 2.

  2. From your browser, type in a fixed IP address. You can use http://216.218.228.119/ (which points to the test-ipv6.com website) as the URL.1

    • If you are using Google Public DNS64 on an IPv6-only system, use http://[64:ff9b::d8da:e477]/ as the URL instead. If this test does not work, you do not have access to a NAT64 gateway at the reserved prefix 64:ff9b::/96 and cannot use Google Public DNS64.

    • If you are using an IPv6-only system without Google Public DNS64, use http://[2001:470:1:18::119]/ as the URL instead.

    If this works correctly, bookmark the page, and try accessing the page from the bookmark. If these tests work (but step 1 fails), then there is a problem with your DNS configuration; check the steps above to make sure you have configured everything correctly. If these tests do not work, go to step 3.

  3. Roll back the DNS changes you made and run the tests again. If the tests still do not work, then there is a problem with your network settings; contact your ISP or network administrator for assistance.

If you encounter any problems after setting Google Public DNS as your resolver, please run the diagnostic procedure.

Switch back to your old DNS settings

If you had not previously configured any customized DNS servers, to switch back to your old settings, in the window in which you specified the Google IP addresses, select the option to enable obtaining DNS server addresses automatically, and/or delete the Google IP addresses. This will revert your settings to using your ISP's default servers.

If you need to manually specify any addresses, use the procedures above to specify the old IP addresses.

If necessary, restart your system.
How do I configure QoS (Quality of Service)/ Traffic Control settings on my router?

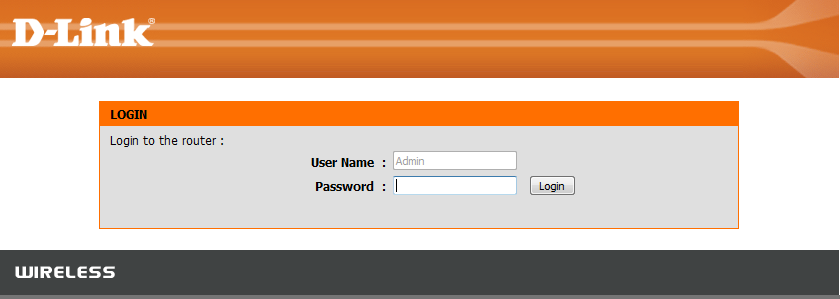
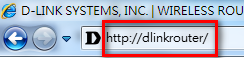
Step 1: Open your Internet browser and enter http://dlinkrouter, http://dlinkrouter.local, or http://192.168.0.1 into the address bar.


Step 2: The default username is Admin. Enter your administrator password. If you have not changed the default password, this field should be left blank. Click Login.

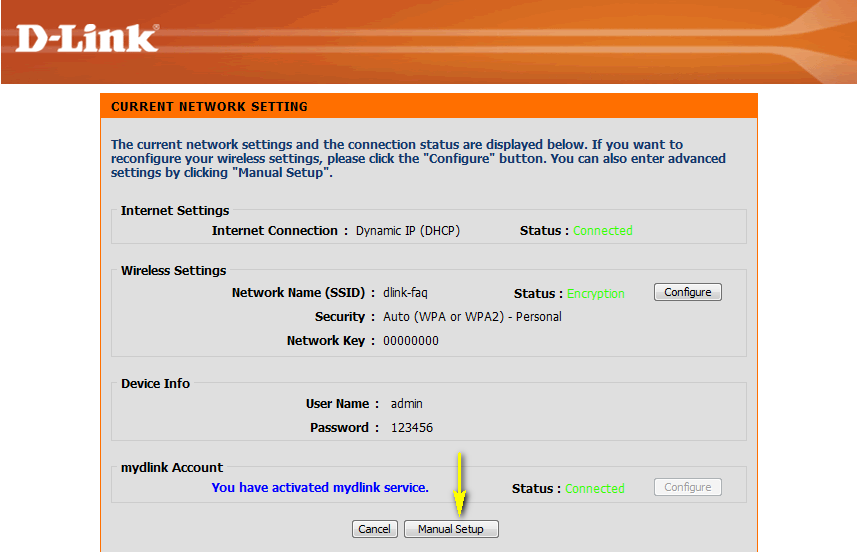
Step 3: Click Manual Setup.


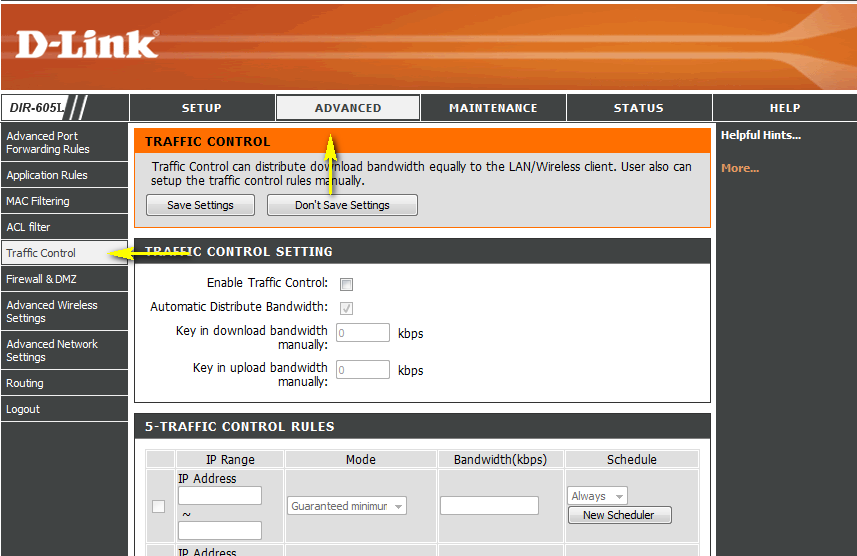
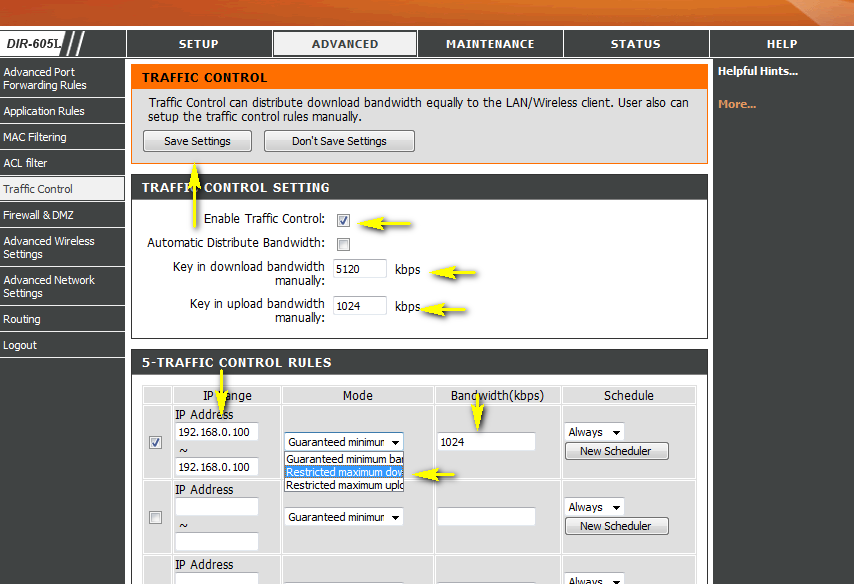
Step 4: Click on the Advanced tab at the top of the page and then click Traffic Control from the menu on the left-hand side.


Step 5: Ensure the Enable Traffic Control box is checked.


Step 6: If you wish to let the router automatically control network traffic, check the Automatic Distribute Bandwidth box. To manually control network traffic, enter the download Bandwidth and upload bandwidth values of your Internet connection in the appropriate fields. These are the speeds at which data can be transferred by your modem to (uplink) and from (downlink) your ISP (Internet Service Provider). This is set by your ISP and will depend on your service plan, and ISP’s network infrastructure. Most ISPs specify speeds in a downlink/uplink pair; for example, a 10M/2M connection has a downlink speed of 10M, and an uplink speed of 2M (1M = 1,024 Kbps).  


To create a traffic control rule, check the box next to the rule to enable it. Enter the IP Address range for clients that you wish to apply the rule to. Select a control Mode from the drop-down menu, and enter a bandwidth value which applies to this rule. To permanently enable the rule, select Always from the drop down menu. To use a pre-defined schedule, select the schedule from the drop-down menu, or click New Schedule to create a new schedule.


Step 7: Click Save Settings when finished.

Thursday, 19 January 2017

CSS Media Query for HTML5 App for All Devices

For non-Retina Display use

/* Smartphones (portrait and landscape) ----------- */
@media only screen 
and (min-device-width : 320px) 
and (max-device-width : 480px) {
/* Styles */
}

/* Smartphones (landscape) ----------- */
@media only screen 
and (min-width : 321px) {
/* Styles */
}

/* Smartphones (portrait) ----------- */
@media only screen 
and (max-width : 320px) {
/* Styles */
}

/* iPads (portrait and landscape) ----------- */
@media only screen 
and (min-device-width : 768px) 
and (max-device-width : 1024px) {
/* Styles */
}

/* iPads (landscape) ----------- */
@media only screen 
and (min-device-width : 768px) 
and (max-device-width : 1024px) 
and (orientation : landscape) {
/* Styles */
}

/* iPads (portrait) ----------- */
@media only screen 
and (min-device-width : 768px) 
and (max-device-width : 1024px) 
and (orientation : portrait) {
/* Styles */
}

/* Desktops and laptops ----------- */
@media only screen 
and (min-width : 1224px) {
/* Styles */
}

/* Large screens ----------- */
@media only screen 
and (min-width : 1824px) {
/* Styles */
}

/* iPhone 4 ----------- */
@media
only screen and (-webkit-min-device-pixel-ratio : 1.5),
only screen and (min-device-pixel-ratio : 1.5) {
/* Styles */
}
For Retina Display use
@media 
  only screen and (-webkit-min-device-pixel-ratio: 2), 
  only screen and (min-resolution: 192dpi) { 
    /* Retina-specific stuff here */
}

Tuesday, 17 January 2017

Change or Spoof a MAC Address in Windows or OS X

Change Windows MAC Address

You can change the MAC address for the network card in Windows pretty easily following the steps below.

Step 1: Click on Start, then Control Panel, then Network Connections, and right-click on the network connection you want to change the MAC address for and select Properties. It will normally either be Local Area Connection or Wireless Network Connection.
 
If you are using Windows Vista, Windows 7 or higher, you have to go to Control Panel, then Network and Internet, then Network and Sharing Center, and then click on Manage Network Connections or Change adapter settings.


Then you can right-click on the adapter and choose Properties.
Step 2: On the General or Networking tab, click the Configure button.
 
Step 3: Now click on the Advanced tab and click on the Locally Administered Address property or the Network Address property.
 
By default, the Not Present value is selected. Go ahead and click on the Value radio button and enter in a new MAC address. The MAC address is a combination of 6 pairs of numbers and characters, i.e. 40-A2-D9-82-9F-F2. You should enter the MAC address without the dashes.
 
You can go to the command prompt and type in IPCONFIG /ALL to check that the MAC address has been changed. Go ahead and restart the computer in order for the changes to take effect.
This is the simplest way to change your MAC address in Windows. You can also do so via the registry, but it’s much more technical and probably not required by most people.


Change OS X MAC Address

Changing the MAC address on OS X is definitely not as easy as it is on Windows. Firstly, you have to use Terminal (similar to command prompt in Windows) to actually change the MAC address.
Secondly, you need to manually figure out the technical name of the adapter before you can change the settings. I’ll explain everything below step by step, but it gets a bit complicated at times.

Step 1: To start, let’s find out the current MAC address for your Mac. You can do this in one of two ways: via System Preferences or via Terminal. Open System Preferences, click on Network and then click on the Advanced button. Make sure to select the appropriate interface first (WiFi, Ethernet, etc) in the listbox on the left.


Step 2: Click on the Hardware tab and you will see the first line is MAC Address. I thought you could simply choose Manually from the Configure dropdown, but that doesn’t allow you to edit the MAC address.


Step 3: In Terminal, you can get the MAC address by typing in the following command:
ifconfig en0 | grep ether
Step 4: This will give you the MAC address for the en0 interface. Depending on how many interfaces you have on your computer, you might need to run this command several times adding 1 to the number each time. For example, I ran the following commands below until I reached an interface that didn’t exist.


Step 5: Now you can simply compare the MAC addresses listed here with the one you saw via System Preferences. In my case, my WiFi MAC address of f8:1e:df:d8:9d:8a matches with en1, so that is the interface I have to use for the next commands.
Before we change the MAC address, you can use a useful command in Terminal to generate a random MAC address if you need one.
openssl rand -hex 6 | sed ‘s/\(..\)/\1:/g; s/.$//’
Step 6: Now that you have a new MAC address, you can change the current one using the following command below. Replace XX with the actual MAC address you want to use.
sudo ifconfig en0 ether xx:xx:xx:xx:xx:xx
Step 7: In order to do this, you need to be logged in as an Administrator or you have to enable the root account in OS X. By default, root is disabled and it’s better to leave it disabled if you can. Just login as an admin and you should be able to run the command just fine. It will ask you for your password, though, before changing the MAC address.
Also, the address won’t change if you are still connected to a WiFi network. You need to first disconnect from any networks and then run the command. Surprisingly, disconnecting from a wireless network in OS X is not intuitive at all. You have to press and hold the Option key and then click on the WiFi icon to see the disconnect option.


So here is a rundown of all the commands I ran in order to get the current MAC address, generate a random one, update the MAC address and then verify to make sure it had actually changed.


As I mentioned earlier, this is definitely not as straightforward as the process is on Windows, but you should be able to do it if you simply copy and paste the commands above. If you have any questions, feel free to post a comment. Enjoy!
 
 
Copyright © 2017 hackkode.com
The content is copyrighted to hackkode.com and may not be reproduced on other websites.

Powered by Allsymptoms.org